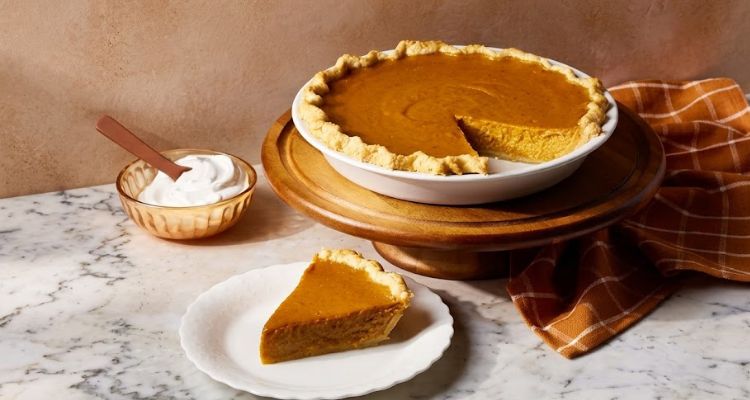
Martha Stewart pumpkin pie fills a pâte brisée crust with a spiced custard of pumpkin puree, brown sugar, evaporated milk, and eggs, then bakes at two temperatures. And the pie serves 8 at around 325 calories in about 1 hour of active time, since the filling mixes in one bowl while the crust chills.
Where most pumpkin pie recipes reach for the jar of pumpkin pie spice, Martha Stewart measures cinnamon, ginger, and cloves individually instead. That control lets you taste each spice on its own terms, which gives the filling a sharper, more layered warmth than a pre-mixed blend can deliver.
Knowing when to pull this pie from the oven is the difference between silky and cracked, because overbaking dries the custard and splits the surface. Look for edges that dome slightly while the center still jiggles, so residual heat finishes setting the filling as the pie cools.
Source: Martha Stewart website
Martha Stewart Pumpkin Pie
Course: DessertsCuisine: AmericanDifficulty: Easy8
servings20
minutes40
minutes325
kcalBrown sugar, cornstarch, salt, and three individual spices whisk together with pumpkin puree, eggs, and evaporated milk in one bowl. Then the filling pours into a pâte brisée shell that has been brushed with an egg cream glaze along the edges. And a 10-minute blast at 425°F followed by 30 minutes at 350°F sets the custard while the crust turns golden and flaky.
Ingredients
- For the filling:
1 cup packed light brown sugar
1 Tbsp cornstarch
1/2 tsp salt
1 tsp ground ginger
1 tsp ground cinnamon
1/8 tsp ground cloves
1 1/2 cups pumpkin puree (fresh or canned)
3 large eggs, lightly beaten
1 1/2 cups evaporated milk
- For the crust and glaze:
1 disk pâte brisée (Martha Stewart’s pie dough, recipe linked separately)
1 large egg (for the glaze)
1 Tbsp heavy cream (for the glaze)
Directions
- Preheat the oven: Set it to 425°F and line a baking sheet with parchment, since the sheet catches any drips during baking.
- Mix the dry ingredients: In a large bowl, combine the brown sugar, cornstarch, salt, ginger, cinnamon, and cloves so the spices distribute evenly.
- Add the wet ingredients: Stir in the pumpkin puree and beaten eggs, then beat well until the mixture is smooth.
- Pour in the milk: Add the evaporated milk and combine, since the filling should be completely smooth before it goes into the shell.
- Roll the crust: Between two pieces of plastic wrap, roll the pâte brisée into a 12-inch circle, then fit it into a 9-inch glass pie plate.
- Trim and crimp: Leave about a 1/2-inch overhang, then pinch to form a decorative edge, and chill for 15 minutes if the dough softens.
- Glaze the edges: Beat the remaining egg with the heavy cream, then brush the glaze lightly on the edges of the pie shell so they brown evenly.
- Fill the shell: Pour the pumpkin mixture into the prepared shell, then transfer the pie plate to the parchment-lined baking sheet.
- Bake at high heat first: Cook at 425°F for 10 minutes, since the initial blast sets the crust quickly and prevents a soggy bottom.
- Reduce and finish: Lower the oven to 350°F and bake 30 minutes more, until the edges dome slightly and the center still jiggles when you move the pan.
- Cool completely: Set the pie on a wire rack and let it cool before slicing, because cutting too early lets the custard run instead of holding a clean edge.
FAQs
Can I use canned pumpkin or does it have to be fresh?
Either works, and Martha notes both options in the recipe. Canned pumpkin puree is more consistent in texture and moisture, so it produces a more predictable filling every time.
Fresh puree varies by pumpkin variety, since some are wetter and need draining before measuring. Use sugar pumpkins or pie pumpkins rather than carving pumpkins, because carving varieties are stringy and watery. Whichever you choose, make sure it is unsweetened puree, not canned pumpkin pie filling, since the filling version has added sugar and spices that throw off the recipe.
Why does the recipe use evaporated milk instead of regular milk or cream?
Evaporated milk has 60 percent of its water content removed, so it gives the custard a rich, creamy body without making the filling too loose. Regular milk is too thin and produces a filling that takes longer to set, while heavy cream would make it overly dense.
Condensed milk is not a substitute here, because it has added sugar and a much thicker consistency that changes both the sweetness and the texture. Stick with evaporated milk at the same 1 1/2 cup measurement, since the recipe is built around that specific concentration.
What does the two-temperature bake do?
The 10-minute blast at 425°F sets the bottom crust quickly, which prevents the soggy-bottom problem that plagues most custard pies. That high heat gives the dough a head start on crisping before the wet filling soaks through.
Dropping to 350°F for the remaining 30 minutes cooks the custard gently, because sustained high heat would curdle the eggs and crack the surface. The lower temperature lets the filling set evenly from the edges inward, so the center finishes cooking from residual heat after you pull it out.
How do I know when the pie is done?
The edges of the filling should dome slightly while the center stays flat or a little sunken, and a gentle tap on the pan should produce a jiggle, not a wobble. A knife or cake tester inserted about an inch from the center should come out clean.
Overbaking is the most common mistake, because the filling looks underdone when it is actually perfect. The custard firms up significantly as it cools, so pulling it while the center still moves is the right call. For another Martha Stewart dessert where timing the bake matters just as much, try her Martha Stewart blueberry crisp.
How should I store the pie, and how far ahead can I make it?
The finished pie keeps in the fridge for up to 3 days, covered loosely with plastic wrap so the surface doesn’t dry out. Bring it to room temperature for 20 minutes before serving, since cold pumpkin pie tastes muted and the crust feels stiff.
Baking the day before Thanksgiving is the best approach, because the filling sets fully overnight and slices cleanly the next day. The crust can be made up to 3 days ahead and kept wrapped in the fridge, so you split the work across multiple sessions. And for another Martha Stewart fall dessert that makes ahead well, her Martha Stewart banana bread freezes and thaws cleanly for holiday mornings.